While" playing "around the Ulu Dungun area in Pasir Raja I came to know that in the good old days the villagers used to walk between Kg Pasir Raja in Ulu Dungun (Terengganu) to Kg Bantal in Central Pahang. The locals used to visit each other's village just for a game of football or maybe to attend a kenduri(wedding reception). Measuring the distance in Google earth shows that the trail is about 125 km long and about 88 km is on the river. That leaves ONLY about 37 km of hiking. Of course that does not include the up hill and the downhills so the actual distance over the terrain is probably 45 to 50 km.
Later I found out that this trail was established by the legendary Malay Warrior Mat Kilau while escaping from the British rulers. It took me many more trips to find out more about this interesting trail. Of course talking to the local villagers will reveal plenty but I have to filter the facts from fiction!
What makes this trail interesting is that we will be trekking up to the source of the Dungun River go over the watershed and then go down along the source of the Tembeling River.
About 2 months ago my partner in crime Sunny Cheong and I met a guy by the name of Lan in Pasir Raja. We started a conversation and I expressed my desire to look for a local guide to guide us to Kuala Tahan from the village. He told us he know of an experienced guide and would introduce him to us.
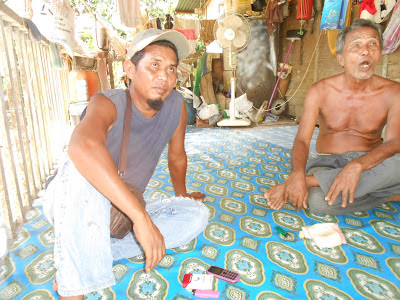
Pak Tar(the old man on the right of Lan) has been staying in Pasir Raja all his life and used to earn his living by collecting rattan from deep in the jungle. He has several relatives in
Kg Bantal ( a very remote village in Central Pahang). After meeting up
with him a date was fixed for the trip....12 May to 16 May 2013. May is a
dry month and would be good for the trip. Just before the trip Sunny Cheong
managed to recruit one of his golfing friends another Cheong CB to come
along. that makes it 3 of us.Pak tar wanted RM 700 to be the guide and I did not argue on that.

So on 12 May 2013 we assembled in front of Pak Tar's house for the first part of the trip which is a drive in a 4 WD vehicle to Mat Kilau's grave for the start of the journey. My brother in law Ban Chet had come along to take the car home. I had prepared an equal pack of ration for Pak Tar as I wanted him to enjoy the same foof that we had. To my suprise he refused to carry his food. I had no choice but to carry HIS part of the ration !
We drove towards the direction of Era Keling which is supposed to be a waterfall and by the time we reached the end of the road it was time for lunch. for lunch I had packed 6 packs of delicious local food from the stall .
After lunch it was time to cross the first river and get moving . The first part of the trail is on abandoned timber track and is quite flat . We were making good progress
Towards the end of the abandoned timber track we came to Sg Temaka which is a small tributary feeding into the Dungun river. From here onwards we tracked uphill along this small stream.
All along the trail we saw Bunga Kuantum which according to our guide is peculiar only in this area
On the uphill part we took frequent rest and at one point managed to get lines for our cell phone. Ops normal call were made to our families.
Even the guide had to take frequent rest...He kept saying "naik bukit susah lah"..meaning going uphill is tough!
My new found friend Cheong CB was in high spirits! He was doing Ok even though he was a tenderfoot in this game.
By the time we decided to set camp for the day it was almost 1830 hrs. Both the Cheongs had to make a shelther
I had my Hennessy Hammock which took only 3 minutes to set up.After all my years of jungle camping I had decided a few years ago that the only way to sleep comfortably and peacefully is a good hammock. No more rock or broken branches under the body..
While they were all busy setting up their shelter for the night I did the cooking.It looks like I will have to do this task for the entire trip! Never mind..since I cook I always get the best and biggest share of the food.!
On the second day we had a simple breakfast of Oats and raisin and commenced our journey at 0800 hrs.
We were told that we would reach a water source after about 3 hrs hiking.
Well we took 2 hours to reach the water source and cooked lunch here.
Lunch consisted of pasta with tuna and some cabbage leaves. After this it is more climbing...all the way up to Bukit Main Angin which is about 2900 ft high.
At the peak we could use our hand phone again so we took a 15 min break . At this point Pak Tar the guide decided that based on our good progress we should be able to meet up with the boat man by tonight. He made a call to the boatman and requested the boat to be ONE DAY earlier..This is the border stone which divides Terengganu and Pahang. After this is it is down hill all the way. the track is quite well defined. At once stage I was stung by some bees. Luckily the others were quite a distance behind me and I had to shout to divert their treks to avoid being bitten by bees.
There was quite a bit of undergrowth along the way but towards the Pahang side the jungle is still primary.
 |
| Kuala Gemala |
Soon we realised that it was a mistake to arrange for the boat to come a day earlier. Cheong CB had cramps and we actually wanted to set camp at Kuala Gemala when we arrived at about 1530 hrs. Seeing that the morale was low, I decided to cook some hot food and we had a good rest before setting off again.
The water in the streams here is very clean. I drank water direct from the stream.
We managed to coax out tenderfoot to life again. This time we were trekking along the Sungei Chey. By now all our shoes were wet . Fresh elephants tracks were sighted. We could smell the elephant here.As it was approach dark I decided that we should camp at Kuala Chey for the night. From Kuala Chey to Kuala Lurut where our boatman is will be another 2 hrs walk.
Some parts of the river can be quite deep....... it was very slippery as we walked on top of the rocks.
By the time we set up camp it was almost dark. The guide took the initiative to trek down to Kuala Lurut to assure the boatman that we are here so that he wont leave without us. Actually I thought it was unnecessary as the boat man will never leave without us (We had not paid him yet!)
Next morning we decided to enjoy the morning at Kuala Chey. We woke up late..at about 0730 hrs.
I found that in the darkness of the night I had tied my hammock just on top of some elephant dung. Luckily there was no smell! But I do feel some softness whenever my buttock touched something when the hammock swings.Real SHIT lah.
The river here is prestine......
We were enjoying the lovely swim on the clear water river . Not a sound of traffic or hand phone ringing! Share prices could bottom down so what.......Not a worry in the world!
The depth of the river is just ideal for a swim.
By 1o00 hrs we started our trek along the Sg Chey again . This time we had to walk on the river.
This is where the local cap Gajah rubber shoes were idea. it provides better grip on the rocks as we went along. A walking stick makes the walk easier too.
The wild elephants had just passed us maybe two hours ago. Just compare the elephant feet to my foot!
The walk was slow and tedious. one wrong step and a fall is almost certain!
Soon we sighted OUR boat. No more walking.. Everyone felt great. We cooked lunch at Kuala Lurut before we boarded the boat to take us to Kg Bantal. Cost of hiring the boat from Kg Bantal to Kuala Lurut is RM 400.
Our boat man was En Noh..a very friendly guy.
By now all of us had enough walking so sitting on a boat is pure haven!
The boatlady (whatever she is called) can really multi task. She can help to navigate the boat through the shallow water, fish (very handy with a jala/casting net) and cook!
Lady at work....
And this is the result after just 10 min of "working".This is going to be our dinner. We traded away our spare sardines for some real fish!
It took us about 3 hrs to reach Kg Macang Periah , a village just across Kg Bantal. this is where En Noh stays and we were offered either to camp near his house OR stay in his house.
We decided to stay a night at Noh's house. After all her wife cooked us a nice dinner with all the fish that was caught on the way home. We were really impressed by the hospitality and the kindness shown by the Noh family. Thank You very much En Noh!
Next morning we took a "Bot Sewa"..literally a water taxi to Kuala Tahan. kit was another 3 hours of river cruising pleasure!
At Kuala Tahan we had arranged Ban Chet to drive my Ford ranger to pick us up.Luch at one of the floating restaurants was great .
CONCLUSION
The Mat Kilau trail is a great trail. On a scale of 5 I would grade the trail as 4.5. it is clean and unspoilt (yet). For future hikers, please keep the cleaniness of the trail. we took out all our rubbish.It is quite a simple trail to hike and the ascend is not so steep. I have included the GPS waypoints for the trip but I would strongly advice the use of a guide as the trail has several sections of undefined tracks.
WE SHALL RETURN TO THIS PARADISE SOON!
N 04.50667 E 102.91438 Started hiking from here 12 May 2013 1230 hrs
N 04.49591 E 102.91244 1305 hrs
N 04.48772 E102.91389 1335 hrs
N04.48280 E102.90651 1405 hrs
N 04.48211 E102.90340 1425 hrs Sg Temaka
N04.47820 E102.89943 1512 hrs
N04.48033 E102.89656 1539 hrs
N04.47693 E102.89598 1625 hrs
N04.48112 E102.88708 Camp 1st night
N04.47854 E102.88136 13 May 2013 0845 hrs
N04.47062 E102.86865 1130 hrs Bukit Main Angin
(Dont confuse with another hill, Gunong Main Angin!)
N04.4777 E102.87850 0920 hrs
N04.4711 E102.97705 1000 hrs
N04.47057 E102.86430 1220 hrs
N04.46667 E102.85754 1305 hrs
N04.46564 E102.84475 1520 hrs Kuala Gemala
N04.44758 E102.81648 14 May 2013 0945 hrs
N 04.47700 E102.65318 1350 hrs
N04.45250 E102.82542 Kuala Chet 1820 hrs
N04.45071 E102.82586 camp 2
N04.44363 E 102.80067 Kuala Lurut
N04.47553 E102.65188 Macang Peria


